SPEEDS in Action: A Step-by-Step Liver Scan & Report Tutorial
Oct 20, 2025
→ DOWNLOAD THE FREE GUIDE THAT ACCOMPANIES THIS BLOG POST!
Do you ever finish a liver scan and then sit there staring at your screen, wondering how to actually describe what you saw? If you answered yes, let me share with you the step-by-step structure I use to help get past this.
I'm Dr. Camilla Edwards, in this blog I'm taking you inside FOVU Club to show you exactly how to use SPEEDS—a simple framework that helps you break down your scans step by step so you can assess what you're seeing and write reports with clarity and confidence.
(If you're new to SPEEDS or want a deeper dive into ultrasound report writing, check out this post on veterinary ultrasound reporting first!)
This month (October 2025) in FOVU Club, we've been focusing entirely on the liver, and I'm going to walk you through SPEEDS applied to hepatic scanning. By the end, you'll know exactly how to describe a normal liver in a structured way—and you'll never feel stuck writing your report again.
It’s about a 15 minute read, so if you’d rather watch a walk though click on the video link below to see my YouTube version.
Let's dive straight in.
What Is SPEEDS?
SPEEDS is your systematic checklist for every scan. It stands for:
- S - Size and Shape
- P - Position
- E - Echogenicity and Echotexture
- E - Edge
- D - Distribution and Dynamics
- S - Sampling
Instead of randomly describing bits of what you see (or worse, forgetting important findings), SPEEDS walks you through each organ methodically. You assess every aspect, document it clearly, and suddenly your reports actually reflect what you found.
Let's apply it to the liver.
S - Size and Shape: Judging Hepatomegaly and Microhepatica
Assessing Size
When you're evaluating liver size, you need anatomical landmarks—not guesswork.
Hepatomegaly is present when:
- The caudal margin becomes rounded (instead of the normal sharp edge)
- The liver extends caudally beyond the costal arch
Microhepatica is trickier to spot, but suspect it when:
- The liver appears small with increased diaphragmatic contact
- The gallbladder seems to take up more room than the liver itself
- Everything's positioned very far cranially (though remember—large dogs naturally have more cranial livers!)
⚡Top Scanning Tip for Size Assessment
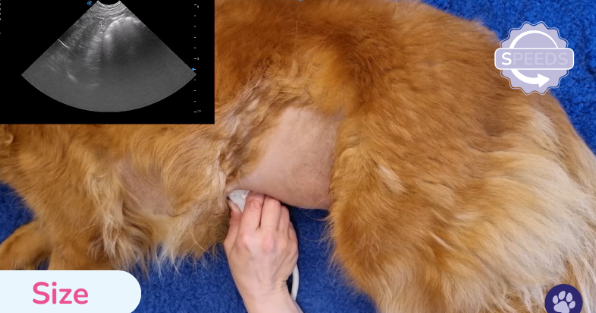
Position your patient in right lateral recumbency and view the liver in a longitudinal plane. When you fan upwards (towards away from the table), you should see liver in the near field and stomach in the far field. This is the perfect spot for judging whether that caudal edge is sharp or rounded.
Here's what you're looking for as you scan:
Starting position: Feel behind the xiphisternum and push your hand into the abdomen. You're cutting through in a longitudinal sagittal plane, and you want to push cranially with your hand into the abdomen—this keeps the probe off bone, which is much more comfortable for your patient.
Optimise your image: Increase your depth until you can see the diaphragm (that hyperechoic line) fully in the image, rounding off at the cranial part of the liver.
Fan systematically: Fan up until the liver disappears, then fan down again until it disappears. You'll fan through the gallbladder along the way.
Rotate and reassess: Rotate your probe (still pushing into the abdomen, not cranially). Now the diaphragm should look much more horizontal. Fan cranially and caudally again to assess the full extent.
What Does Hepatomegaly Look Like?
When you're scanning in that near-field position (close to the stomach), reduce your depth to really focus on this area. You should be able to make a clear judgment:
- Is the liver rounded instead of sharp?
- Is it distorted in shape?
If yes to either, you're looking at hepatomegaly.
Assessing Shape
The overall shape of the liver should be smooth and uniform. In a normal scan, the liver maintains consistent contours without:
- Bulges
- Lobulation (you shouldn't be able to distinguish individual liver lobes unless something like ascites is pushing them apart)
- Focal distortions
These changes often accompany hepatomegaly, but can also indicate focal lesions altering the liver's architecture.
Shape Assessment Tip
You won't normally see individual liver lobes unless ascites is separating them. Focus instead on the overall contour. Sharp caudal edges are normal. Rounded margins or focal bulges suggest enlargement or possibly a focal tumor.
What to document:
"The liver extends [within/beyond] the costal arch with a [sharp/rounded] caudal margin. Overall contour is [smooth/irregular] with [no/focal] distortion noted."
P - Position: Where Should the Liver Be?
This one's usually straightforward, but when it's abnormal, it matters.
Normal Liver Position
You should expect the liver to be:
- In the cranial abdomen
- Beneath the costal arch
- Caudal to the diaphragm with normal contact (nothing between them)
The diaphragm often shows up as bright white—that's actually the gas being reflected from the lungs. The liver should sit just caudal to that.
When Position Is Abnormal
Abnormal positioning isn't particularly common, but might occur with:
- Diaphragmatic hernias (liver moved cranially into the chest)
- Space-occupying lesions (pushing the liver caudally)
- Ascites (pushing the liver away from the diaphragm wall)
⚠️Position Warning
Don't mistake a break in the diaphragm for a hernia! This is often seen where the caudal vena cava crosses the diaphragm, but can also appear as a refraction artifact when the sound beam hits the diaphragm at just the wrong angle. (I've seen this catch out many vets!)
What Position Problems Look Like on Ultrasound
Ascites: You'll see fluid pushing the liver away from the diaphragm wall—it's lost contact.
Diaphragmatic hernia: You're seeing liver in the chest when you scan cranially. You'll see lung gas, then liver just on the other side of where the diaphragm should be.
What to document:
"The liver maintains normal position in the cranial abdomen [within/beyond] the costal arch, caudal to the diaphragm with [intact/disrupted] diaphragmatic contact. [No displacement noted / Evidence of...]"
E - Echogenicity and Echotexture: Getting the Brightness Right
This is where things get interesting—and where many vets get tripped up.
Understanding Echogenicity
When we talk about echogenicity, we're thinking about whether something is hypoechoic, isoechoic, hyperechoic, or anechoic—and these are all by comparison.
The liver should be:
- Slightly less echogenic (darker) than the spleen
- More echogenic (brighter) than the renal cortex
Understanding Echotexture
Echotexture, in contrast, is about how homogeneous or heterogeneous the organ is.
A normal liver should be reasonably homogeneous, but you should still be able to see:
- Portal veins throughout (with bright hyperechoic walls)
- Hepatic veins (appearing as round anechoic "holes" within the parenchyma)
Watch Your Machine Settings!
Be careful not to confuse machine settings with actual tissue changes. If you're adjusting your overall gain dramatically, you might think you're seeing echogenicity differences when really it's just the machine buttons you're changing.
Always compare organs within the same image using consistent settings.
Echotexture Tip
In a normal liver, you should expect to see:
- Portal veins with bright hyperechoic walls
- Hepatic veins as round anechoic holes within the parenchyma
- Bile ducts are NOT usually visible (though in cats they may occasionally be seen—and can be quite tortuous)
The key is a uniform background echotexture with normal vascular landmarks standing out clearly.
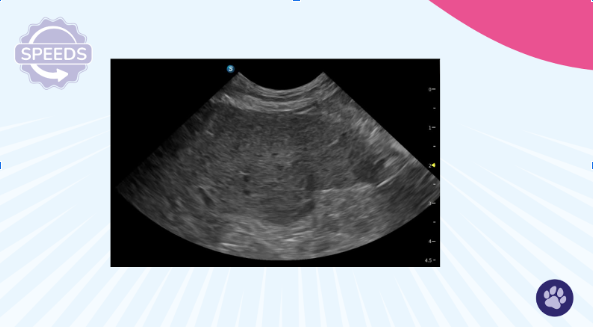
What Abnormal Echogenicity Looks Like
Hypoechoic liver: The portal veins will stand out really clearly against the darker parenchyma. There are many causes—you really need a sample (ideally a biopsy) to work this up further.
Hyperechoic liver: Think hepatic lipidosis or steroid hepatopathy.
Heterogeneous liver: You're seeing a mix—some hypoechoic areas, some anechoic regions, maybe some nodules. This needs further investigation.
What to document:
"The liver parenchyma is [iso/hypo/hyper]echoic compared to the spleen and renal cortex. Echotexture is [homogeneous/heterogeneous]. Portal and hepatic vessels are [clearly visible/poorly defined] and [normally/abnormally] distributed."
Hypoechoic liver with bright portal veins (purple arrow).
E - Edge: Smooth or Irregular?
The edge of the liver should appear smooth, continuous, and well-defined.
Any irregularities, nodules, or poorly defined margins could signal underlying disease or perihepatic changes—and these should always be noted.
What You're Looking For
- Smooth capsule with no irregularities
- No nodules along the margins
- Clear definition between liver and surrounding structures
Critical Edge-Scanning Tip
Between the liver and diaphragm is a common place for free fluid to collect.
Always scan to the most cranial point to check for subtle effusions that can otherwise be missed. Don't just look at the middle section of the liver and call it done!
Here's how: Rock your probe to really get that cranial portion of the liver included. Many people will cut off the liver partway through and only see the middle section—you need to fan all the way cranially.
What Perihepatic Fluid Looks Like
You'll see the liver with nice portal veins and hepatic veins visible, then that bright white diaphragm along the top. Look carefully at the space between—that's where subtle free fluid collects.
Refraction artifact heads-up: Sometimes you'll see what looks like a "hole" in the diaphragm when there isn't one. This is often a refraction artifact where the sound beam hits at just the wrong angle. Don't panic!
What to document:
"The hepatic capsule appears [smooth/irregular] with [no/focal/multiple] nodules noted. [No/Subtle/Moderate] perihepatic fluid present between the liver and diaphragm."
D - Distribution and Dynamics: The Complete Picture
Distribution: Checking the Whole Organ
In a normal liver, the parenchyma should look the same throughout—no focal or multifocal changes. The portal vasculature should be visible and regularly spaced throughout.
Describing normal distribution confirms that you've checked the whole organ, not just one window.
Distribution Scanning Tip
Fan slowly through the liver in two planes to assess the entire parenchyma.
Don't stop when you see one normal (or abnormal) area. Focal changes can be missed if you don't cover the whole organ systematically.
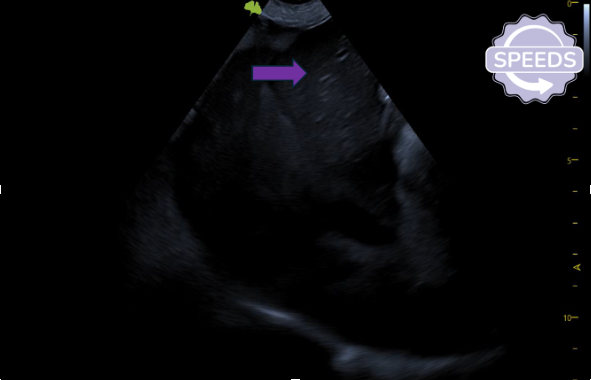
What Multifocal Changes Look Like
When you're fanning through, you might see:
- Nodules (one large one, or multiple smaller ones)
- Hypoechoic areas scattered throughout
- Heterogeneous regions that differ from the surrounding parenchyma
The liver itself might be globally hypoechoic, but those focal areas will stand out as different.
Hypoechoic lesion in the caudal liver.
When You Find a Focal Lesion: Run a Mini-SPEEDS.
Once you've found a focal or multifocal area that's different, it's really important to describe that lesion in detail. You do this by repeating SPEEDS on the lesion itself:
S - Size: Measure height, width, and depth. You really need three measurements (two planes) to understand how big this lesion is. This measurement is key—if you don't pursue further treatment immediately, monitoring the lesion for size change is a potential next step, but you need that baseline measurement documented.
S - Shape: Scan through the lesion in two planes. Is it round? Irregular? Elongated?
P - Position: Which side of the liver? Which lobe? Associated with the gallbladder or other structures?
E - Echogenicity and Echotexture: In the example from our video, the lesion is quite hypoechoic compared to the rest of the liver, but it's quite homogeneous within itself.
E - Edge: Is it poorly defined or well-defined? Does it have a regular edge or irregular border?
D - Dynamics: This is really key. Think about blood flow in the lesion. Put power Doppler on to assess whether there are any blood vessels. In our example, you can see one vessel entering the lesion.
S - Sampling: Is this something you could safely sample? Are there big blood vessels in the way? Other organs you'd have to go through? Is the distance reasonable for a needle to extend to?
All of these observations should be noted in your report.
Dynamics: Blood Flow and Bile Flow
When thinking about dynamics in the liver, we're really thinking about blood flow and bile—how are these moving through the organ?
Normal Findings
You should see:
- Smooth portal veins with hyperechoic walls
- Unobstructed drainage via the caudal vena cava and hepatic veins
- No visible bile duct dilation (though in cats, small ducts might occasionally be seen and can be quite tortuous)
Abnormal Dynamics Might Suggest
- Vascular anomalies (like portosystemic shunts)
- Biliary obstruction
Dynamics Assessment Tips
First, assess blood flow:
- Follow the portal vein as it enters the liver
- Check the caudal vena cava and hepatic veins at the diaphragm
- Any abnormal direction of flow or turbulence might suggest a shunt or obstruction
Then assess bile flow:
- Ducts should not be dilated in a normal liver
- In cats, small ducts might occasionally be visible (and can be tortuous)
- Dilation or irregularity raises suspicion for obstruction
What to document:
"Portal venous flow appears [normal/turbulent/reversed]. Hepatic veins and caudal vena cava demonstrate [patent/compromised] drainage. Bile ducts are [not visualized/not dilated/mildly dilated/significantly dilated]."
Ultrasound with colour Doppler showing normal hepatic blood flow

S - Sampling: Should You? Could You?
Here's the final piece, and honestly one of the most important: Consider sampling even if you're not planning to do it right now.
Why Sampling Matters
Ultrasound is brilliant at finding pathology, but not always great at differentiating it. We often need those cells to really get to our differential diagnosis.
Ultrasound-guided sampling can absolutely help, but it's an additional skill to develop.
When Is Sampling Needed?
Normal liver: No sampling needed, but document that it was considered and why it wasn't indicated.
Pathology present: Consider:
- Fine-needle aspirates (FNA)
- Biopsies
- Bile aspirates
- Other sampling techniques depending on clinical indication
Sampling Decision Framework
Always weigh diagnostic value against risk:
Assess the risks:
- Bleeding risk (check clotting status!)
- Are there big blood vessels nearby?
- Patient stability
- Access to the lesion (can you reach it safely without going through other organs?)
Consider the benefits:
- Will this change management?
- Is the diagnosis uncertain without cytology/histopathology?
- Does the client understand the value?
What Ultrasound-Guided Sampling Looks Like
In the video, you can see me taking a fine-needle aspirate from the liver. The needle tip comes in using the "woodpecker technique" (I'm not aspirating continuously—just advancing the needle in small movements). I'm carefully avoiding any large vessels before withdrawing the needle, placing the sample on a slide, and sending it off for cytology.
Sampling Tip
Even if you're not going to perform sampling yourself, really consider:
- Would it be safe in this patient?
- Would it be beneficial for this patient?
Start thinking along these lines. It builds your clinical reasoning and helps you communicate better with specialists when you do need to refer.
What to document:
"No sampling performed; liver appears within normal limits and clinical signs do not warrant further investigation at this time"
OR
"Ultrasound-guided FNA/biopsy recommended and discussed with owner. Lesion accessible with no major vessels in sampling path. [Performed/Declined/Referred for sampling]."
Putting It All Together: SPEEDS in Your Reports
If you've ever second-guessed yourself after a scan, you now know there's a better way forward.
SPEEDS gives you the structure to:
- Stop feeling vague
- Stop doubting yourself
- Start writing reports you can stand behind with confidence
And this was just a taste of what we're working on inside FOVU Club.
What's Inside FOVU Club?
Each month, we focus on one anatomical area (this month it's the liver!), and members get:
✅ Detailed "how to scan" videos with 3D anatomy and proper probe positions
✅ Pathology and update sessions covering what you actually see in first opinion practice
✅ Real first-opinion cases (not textbook perfect images!)
✅ Live "Ask Me Anything" sessions where I give feedback on YOUR scans
✅ The complete SPEEDS framework for every abdominal organ
Your Next Steps
Ready to put SPEEDS into action?
Download the FREE FOVU SPEEDS™️ Reporting Guide →
It gives you prompts for every abdominal organ so you can start using SPEEDS in your very next scan. No more staring at blank report templates wondering what to write.
Want structured training with ongoing support and feedback?
Inside, you'll get monthly focused training, real cases to learn from, and a community of first-opinion vets who are building their ultrasound confidence right alongside you.
Your scans might be silent, but your reports shouldn't be. Let SPEEDS speak for your thinking—and let's get you scanning (and reporting!) with the confidence you deserve. 🎯
About Dr Camilla Edwards
I’m a first-opinion vet, and I know what it’s like to feel unsure at the screen. That’s why I started FOVU—to help busy vets feel more confident using ultrasound in real consults, even when time is short. Through my signature course The Basics and the FOVU Club membership, I share simple frameworks, ways to practise without pressure, and tips for writing reports you’ll actually feel proud of.
